ATTENTION:This site has a dark mode. If you’re on desktop, you can activate it via the drop down menu on the side bar under themes. If you’re on mobile, it’s located at the bottom, somewhere after the post.
Preface:
I’ve been experimenting with various offensive builds with Nioh for a while now, and thought I’d share this last one I came up with. I’ll do my best to keep things succinct.
Build Goal:
This build tries to maximize damage outside of living weapon while enabling as much openings as possible for the player to take advantage of through a combination of elemental damage immunity, projectile damage immunity, no stagger, and evasion attack damage surge combo with strong attack, which altogether results in more openings and a powerful combo that can have little to no commitment depending on the stance.
It also enables effective use of Sanctity Talisman if needed.
Build Audience:
This build is not for:
1. Coop due to Received Firearms Damage failing to sufficiently reduce projectile damage during online play.
2. Beginners. Please build your farming build first. I can’t recommend a non-living weapon build for farming. It’s too slow even if you take all the luck/amrita/item drop/equip drop/…etc. boosts. Oh, and you can’t get starred effects until late in the game. I’m not sure when they start appearing but they’re definitely not in NG.
3. People who only want to kill the boss as fast as possible.
4. People who don’t like getting oneshotted.
What this build does is give you plenty of damage and plenty of openings to take advantage of, such that fighting against bosses can be trivial, but not a boring experience.
What is Evasion Attack?
An evasion attack is executed by pressing X (with or without a forward on your analog stick) followed by a square or triangle.
It is actually both a dash attack and an evasion attack, as you can use it for either purpose.
What the game refers to as a dash attack is actually better termed as a running attack.
The evasion attack is one of the best ways to get right at someone’s face, give them a one two, and then promptly excuse yourself.
Stats:

Body: 12
Horned Turban Helmet Prerequisite.
Heart: 200
Stamina: 200
Strength: 200
Damage scaling.
Skill: Default.
Unnecessary. We have more than enough ki pulse.
Dexterity: 30
For ninjutsu capacity. Note that the ninjutsu points at this level aren’t enough to get us everything we want, so ninja locks will be needed.
Magic: 100
For elemental effect bonus, an extra 1 onmyo capacity, and onmyo damage bonus.
Spirit: 44
For more onmyo magic power.
Note: Level caps will be raised as you progress through the different playthroughs. You do not need to finish the DLC.
It is recommended to keep unlocking new difficulties until no longer possible by completing The Queen’s Eyes mission in every new difficulty unlocked.
Focus Level: Attack.
Focus levels happen after reaching the level cap of 750.
There are four options: luck, defense, life, and attack.
Attack is preferred as none of the other attributes offer enough to make a difference.
The attack bonus is also small, but it’s still the best out of the four. After all, we can never have enough attack.
Titles
Use Koan Manual to respec. Can bought from Hidden Tea House.
Ungyo: Get everything except for Damage From Fall, Elixir Effect, and Gold Drop Rate.
Agyo: Get everything except for Life, Vs Yokai Realm, and Durability of Living Weapons.
Note: The build can’t be completed until you have 15% of elemental damage reduction from the titles.
Gear:
Set Bonuses:
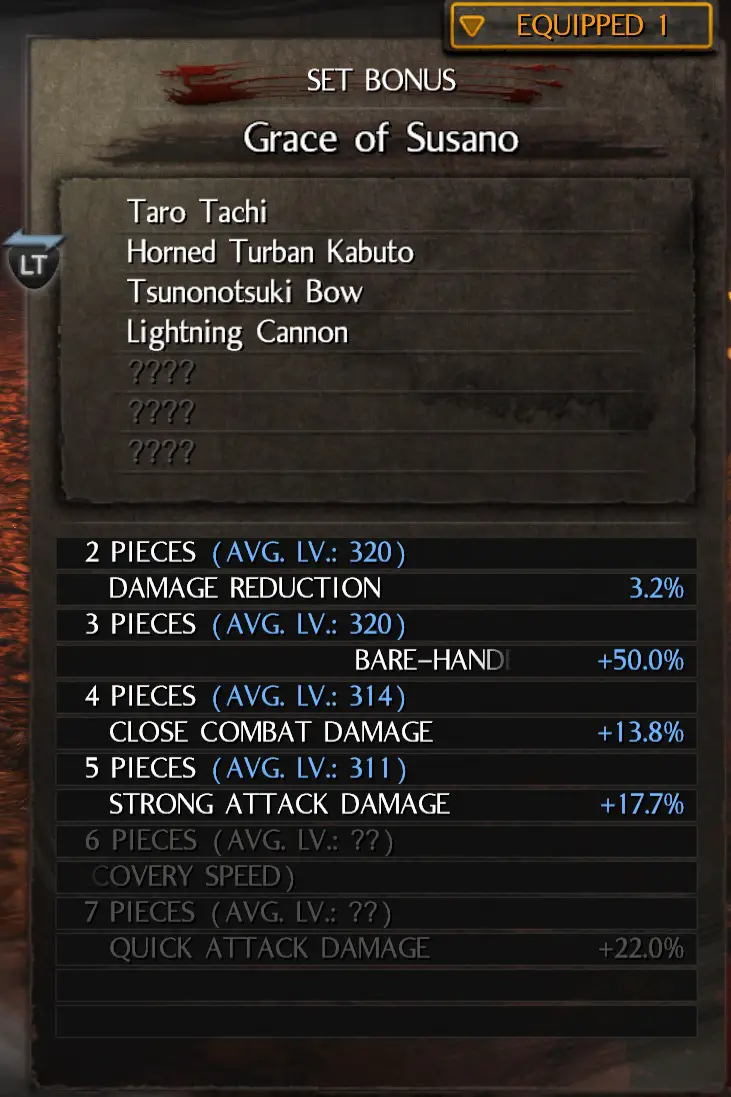
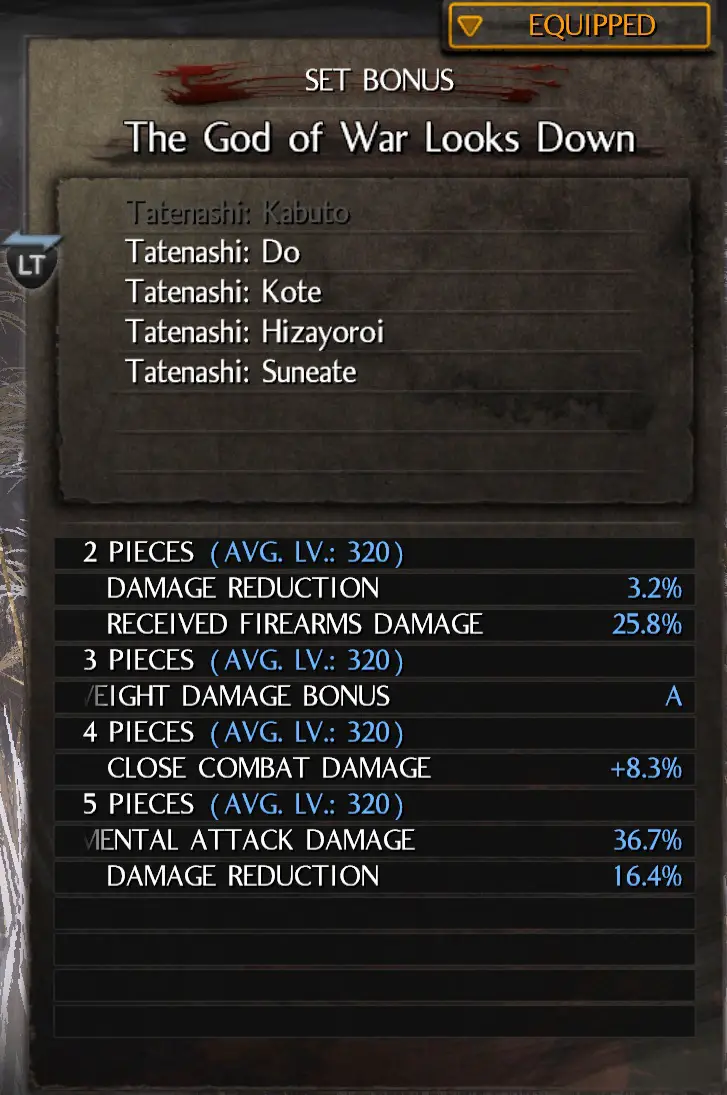
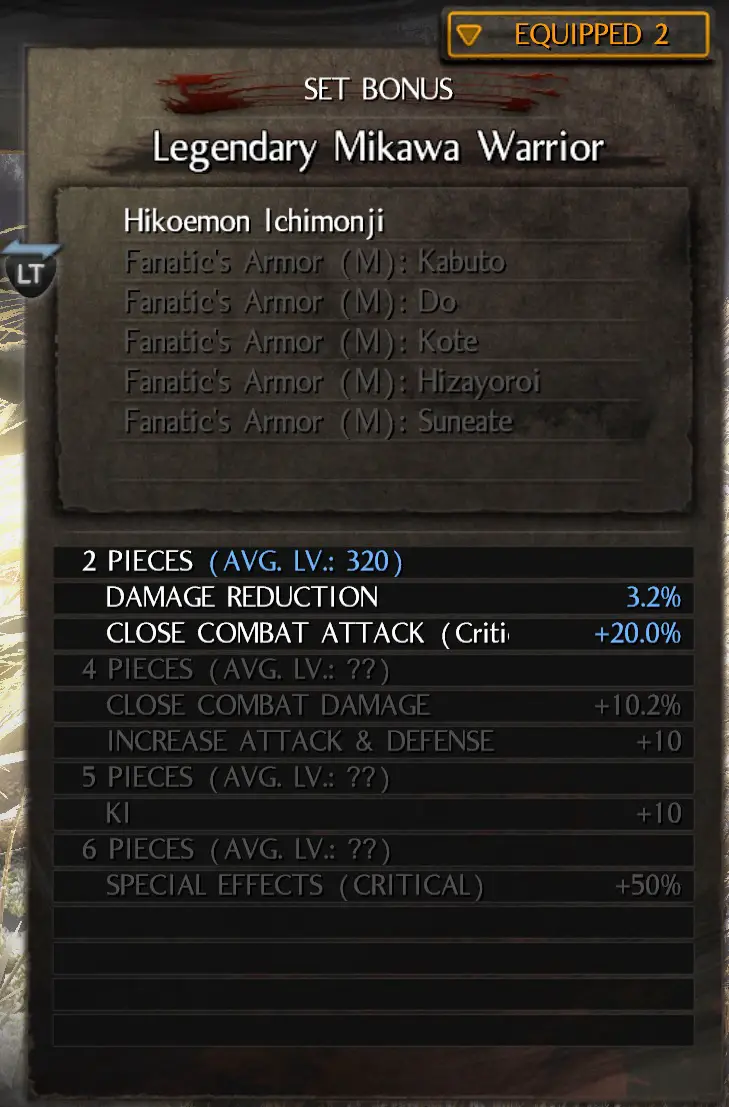
Grace of Susanoo (5 pieces)/The God of War Looks Down (5 pieces)/The Legendary Mikawa Warrior (2 Pieces)
Ethereals don’t start dropping until Way of the Wise.
Susanoo can be gotten by defiling on floor 21, and then leaving at floor 24. Save scumming is advised.
We want as many unique modifiers as possible because stacking is additive and introducing new modifiers is multiplicative (better results).
With that in mind, we get:
Susanoo for the strong attack damage bonus.
Tatenashi for the reduced firearms damage, equipment weight damage bonus (15% above 30.1 weight), and elemental damage reduction.
The EWDB will allow us to take Agility Damage Bonus for our ranged, which is at least a 10% damage bonus at Agility B. We say at least because that 10% is supposedly for the Agility Damage Bonus A, when we’re getting the A+.
The fanatic set for 20% CCA when critical.
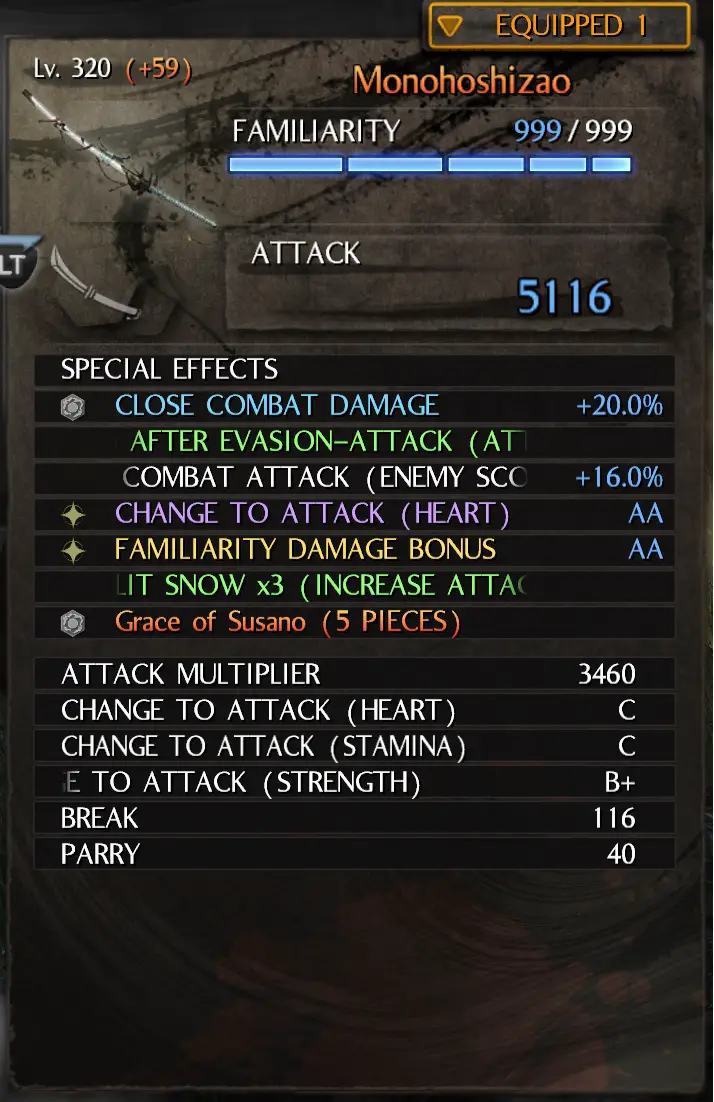
Primary Melee Weapon: Taro / Jiro Odachi or Monohoshizao
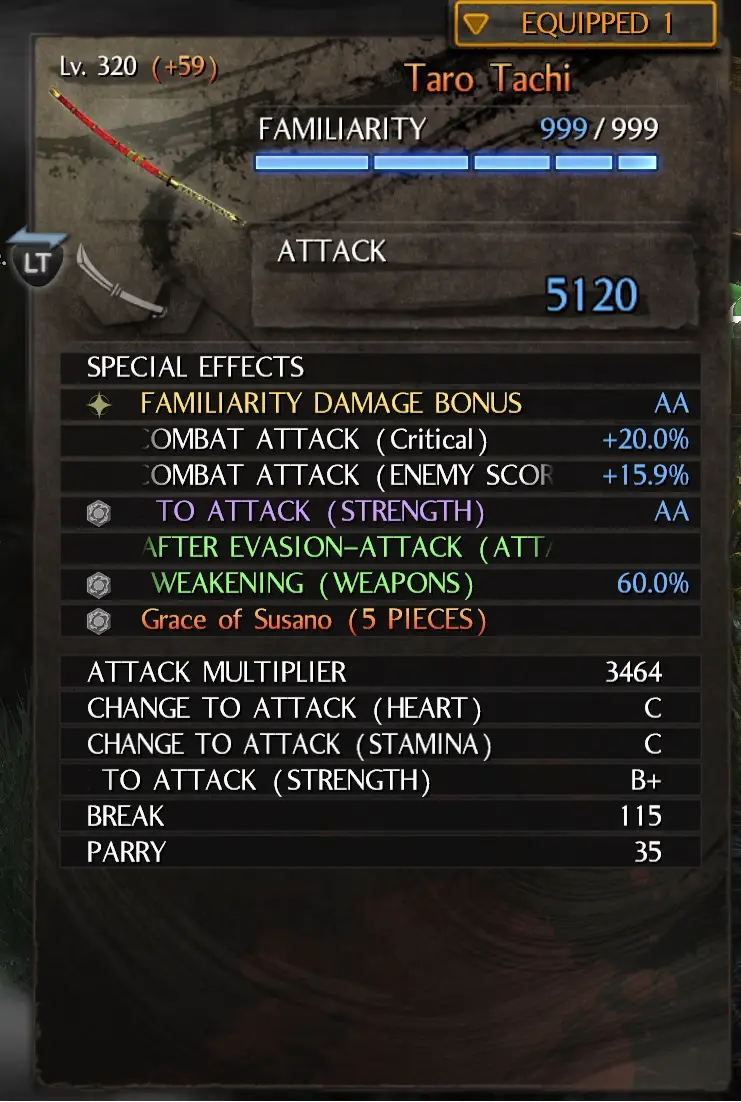
Taro/Jiro vs Monohoshizao
Given the same level and special effects, the Taro Odachi has a 4 attack rating advantage over the monohoshizao and the ability to choose CCA (Critical). This translates to a 1.2% difference in damage tests.
Also, the taro/jiro odachi has an innate 60% Nullify Weakening (Weapons) at max familiarity, whereas rolling it normally will only go up to 34.9%.
If Nullify Weakening (Weapons) is not desired or for convenience’s sake due to the much more accessible smithing text, the monohoshizao can be taken over the Taro/Jiro odachis.
Smithing Text Location
Taro/Jiro Odachi
I am not aware of any other location to farm for the taro/jiro smithing text other than Hanzo at the red flag of the 4th floor of the abyss, who is usually used to farm for every smithing text in the game. A video below has been provided for your reference (Credits to ELT Gaming):
Do be informed that the drop rate is abysmally low. On top of that, the taro odachi smithing text will have to compete with the plethora of other smithing texts that Hanzo keeps in his secret pocket.
Monohoshizao
The monohoshizao smithing text is dropped by Sasaki Kojiro in the sub mission, Ganryu.
To unlock the mission, you need to beat the dual swords dojo mission, the Grimmest Blade, and then the mission that unlocks after that, the Master of the Twin Blades. According to /u/zakorak he also needed to do Dance of Yokai, Dragon Returns, Siege of Osaka Winter, and Scion of Virtue to unlock the mission.
If you’re lacking proficiency with a weapon, just go to the Greater Demon Hunting mission in the 3rd region, take out the weapon your lacking in proficiency with, and smack Onryoki in the arse until he keels over. Rinse and repeat. It’s ok if you die too. You still keep the proficiency points.
Also, the higher the difficulty the more proficiency points you receive. I recommend you do this in Way of the Nioh.
Familiarity Damage Bonus AA
This is a starred effect and can only be either forged for or looted in the abyss.
The video below claims it gives a 2.6% increase over its A counterpart (Credits to Ersin Yalçın).
https://www.youtube.com/watch?v=24H4KIwTq7Q
If you don’t think it’s worth it, then Familiarity Damage Bonus A will do.
CCA, CCD, Stance Attack
I tested all three different damage modifiers to see which one would work best.
See the numbers below for your reference:
All numbers were taken while critical and with a Taro Odachi at Level 320 (+59). (For new players, weapons gain a +level later on in the game. It’s just another way to level your weapon.)
CCA (Critical) 20% (With x2 Special Effect (Critical) +14% Accessories)
High Strong: 18947
Mid Strong: 14228
Low Strong: 11388
CCD 20%
High Strong: 18741
Mid Strong: 14074
Low Strong: 11265
Mid Attack 21%
High Strong: 15942
Mid Strong: 14179
Low Strong: 9582
Why Mid Attack?
High stance evasion attack combo is too slow, and low stance evasion attack combo is too weak. Mid attack is the middle child that’s slow, but not overly, and deals a lot of damage, so if we can only have one damage modifier, then it goes to mid.
CCA vs CCD
Mid attack lead over CCD in mid stance is a whopping one percent, so it and its ilk can go. They’re dismissed.
CCA (Critical) is king provided we have special effect (critical) +14% accessories; otherwise, CCD wins out because mid only has a one percent lead over it in mid stance and way behind in all other stances.
Why CCA (Scorched)?
The alternatives are CCA (Enemy Out of Ki) +19.9% or CCA (Zero Ki) +19.9%. I went with CCA (Scorched) because it’s easier to inflict for either yokai or human, making it more universal, whereas the other two stats are practically exclusive for either human or yokai respectively, and are not so easy to inflict.
It’s also the easiest to inflict among the different status ailments because of 1. Kato. 2. Flame dragon scroll 3. Burning oil jar. The third of which works extremely well with extraction talismans.
If you’re using the monohoshizao, remember that you can triple forge for this to get a perfect value.
Attack Damage Surge is Good After All
Previously Attack Damage X2, now heavily nerfed and a shell of its previous self. It no longer does double damage, but still does plenty of damage nonetheless.
The duration of this buff lasts for about a second, just enough for us to dish out a single strong attack, and gives at least a 50% to 60% increase in damage.
Extra Slot for the Monohoshizao
If you got the Monohoshizao over the Taro/Jiro for whatever reason, then assuming you don’t want Nullify Weakening (Weapons), I recommend one of the following options:
1, Bonus After Dash Attack (Nullify Damage/Increase Movespeed)
2. Moonlit Snow X3 (Increase Attack)
3. Final Blow Damage +25.0%
4. Starred Skill Damage Twin Moons +19.9%/Devastation Charge +21.9%
#1 I recommended the Increase Attack for the dash bonus in the gloves section, so just pick one of these two here. Some bosses attack twice no matter what, so nullify won’t always work, as it only works once. If you get increase movespeed, you will move stupid fast.
#2 Gives a 13.6% increase and lasts for 25 seconds, give or take some, but you need the first three hits of a slow moonlit snow to invoke it, so only useful for slow yokai bosses.
#3 Not fond of this since final blows already deal plenty of damage, but if you want stronger final blows, here you go.
#4 If you get a starred skill damage, you’ll have to sacrifice CTA Strength. That’s ok, actually. It’s not a big increase in damage, smaller than the familiarity damage bonus, so you don’t lose out to much. In exchange you’ll get a huge buff to a skill’s damage, so as long as you use that skill consistently you gain more.
I recommend twin moons or devastion charge. The former because it can be used with an evasion attack combo from low stance if you follow my skill setup (forward X, triangle, triangle, square, triangle), and the latter because it’s one of the best odachi skills. Moonlit snow isn’t recommended because you’re probably not going to land the whole thing other than slow yokais.
Secondary Melee Weapon: Hikoemon Ichimonji (Legendary Mikawa Warrior/Fanatic Set Bonus (2 Pieces))
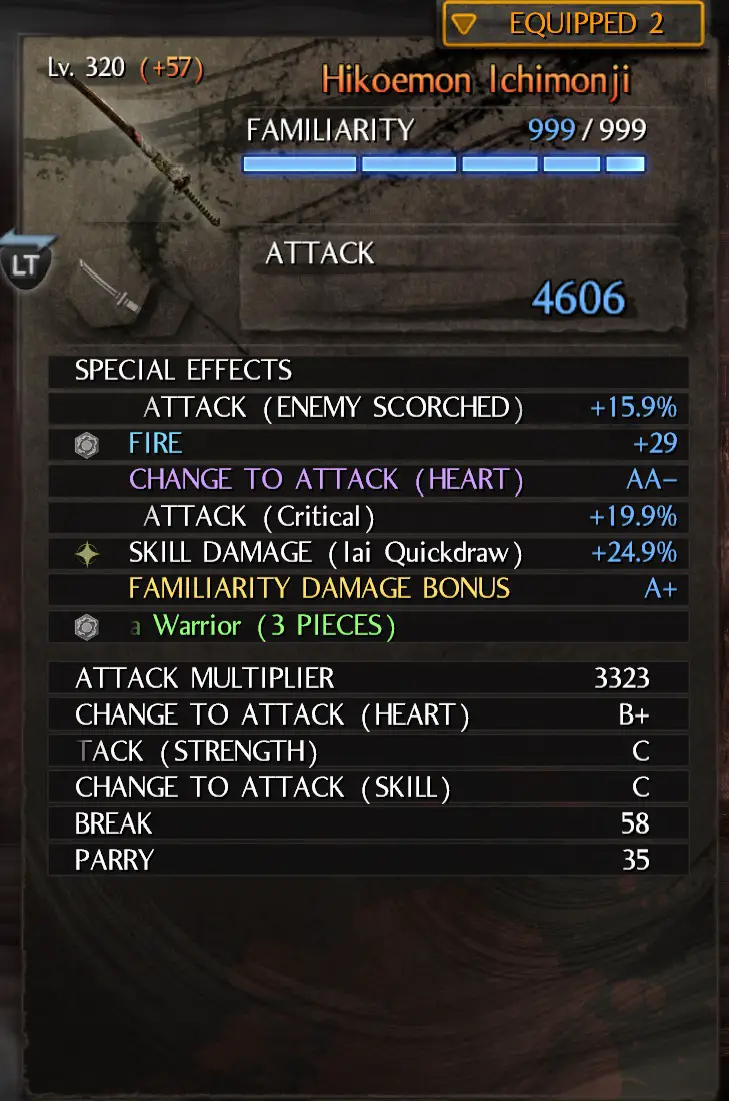
Taken solely for the set bonus. We don’t benefit from any of the special effects reforged onto this weapon unless we switch to it. Feel free to reforge it to your liking.
Also, with 100 magic and 44 spirit, we receive more damage from Leeching than from Summer Twilight or Rage, so we don’t lose any damage from not having axe/kusarigama on our second slot.
Smithing Text Location
Wiki says you can get it from the Immortal Flame mission in Sekigahara Region (Region #5)
Primary Ranged Weapon: Lightning Cannon
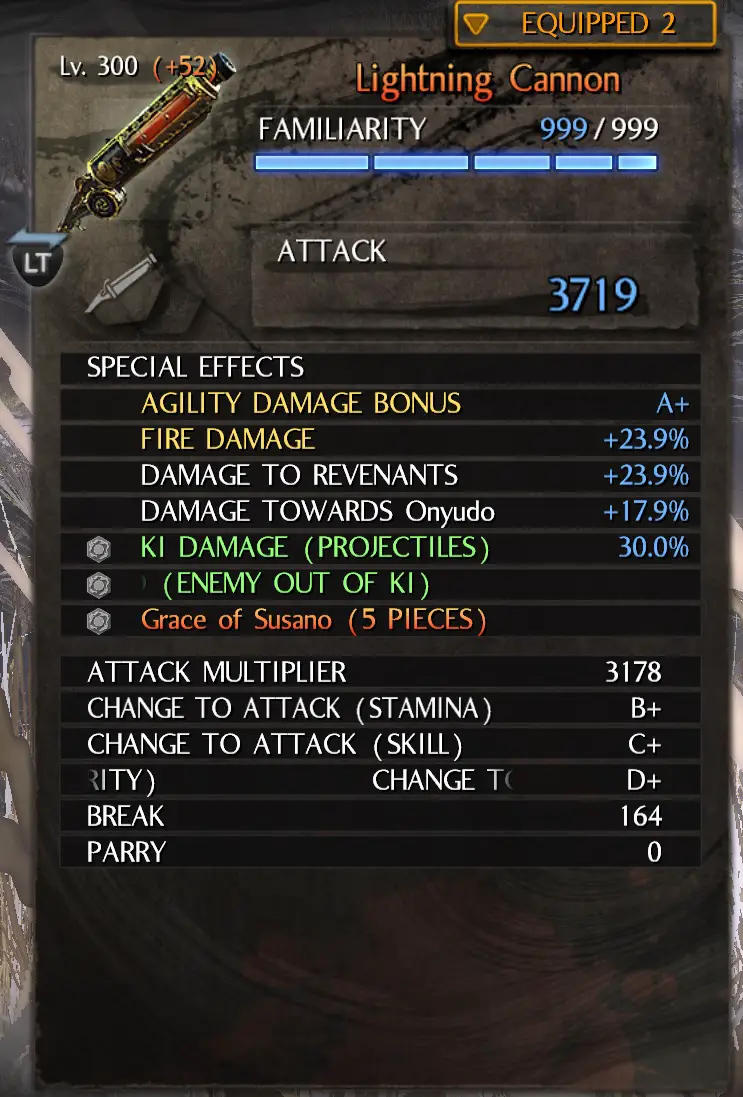
Special Effects:
1. Agility Damage Bonus A+
2. Fire Damage +23.9%
3. Damage to Revenants +23.9%
4. Damage toward Your Yokai of Choice +17.9%
5. Ki Damage (Projectiles) (Locked) 30.0%
6. Increase Ki Recovery (Enemy Out of Ki)
7. Susanoo’s Grace (5 Pieces)
Note: You’re not supposed to shoot with this. The purpose of this weapon is to buff our melee attack.
#1 Agility damage bonus because we already have Equipment Weight Damage Bonus from Tatenashi. You need to forge three effects at the same time to get this. It is also relatively easy to get two perfect values with ranged weapons should you wish to try your luck. (E.g. Agility Damage Bonus A+ and Fire Damage +24.0%)
#4 Pick whatever you want here. Just know that the datamine says Magatsu Warrior is not an option, so don’t bother rolling for him.
#7: Defile on floor 21, leave at floor 24 to get. Save scum.
IMPORTANT: You only get the buff from the ranged weapon you have on hand. The set bonus is the only thing that is active regardless.
Drop Location:
I don’t know, but you’ll get it as you make your way to WOTN. It’s not particularly rare or anything. No starred effect too.
Secondary Ranged Weapon: Tsunonotsuki Bow
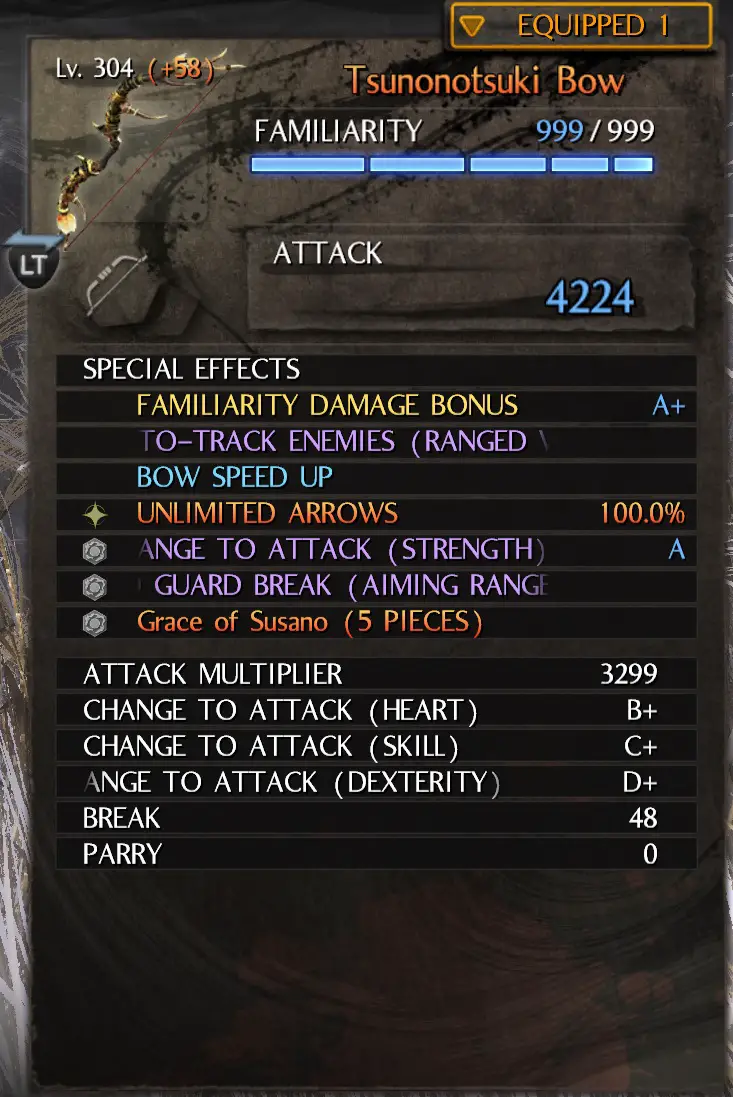
Special Effects: (Note: This one we shoot with.)
1. Familiarity Damage Bonus A+
2. Auto-Track Enemies (Ranged Weapon) (Only if you can’t aim with a controller like me.)
3. Bow Speed Up
4. Unlimited Arrows 100,0% (Starred) (Abyss-only Drop)
5. CTA Strength A (Locked)
6. No Guard Break (Aiming)
7. Susanoo’s Grace (5 Pieces)
Feel free to reforge this weapon into whatever you want. You can make a shooter-type, a weapon that we actually shoot with like the example above, or another buffing type like the previous ranged weapon, except you’ll want to make it buff your farming abilities instead since the previous weapon already buffed our damage capabilities.
#4 Can only be gotten from the abyss. For your reference, I got my first one after floor 120 and under floor 150.
Helmet: Horned Turban Kabuto
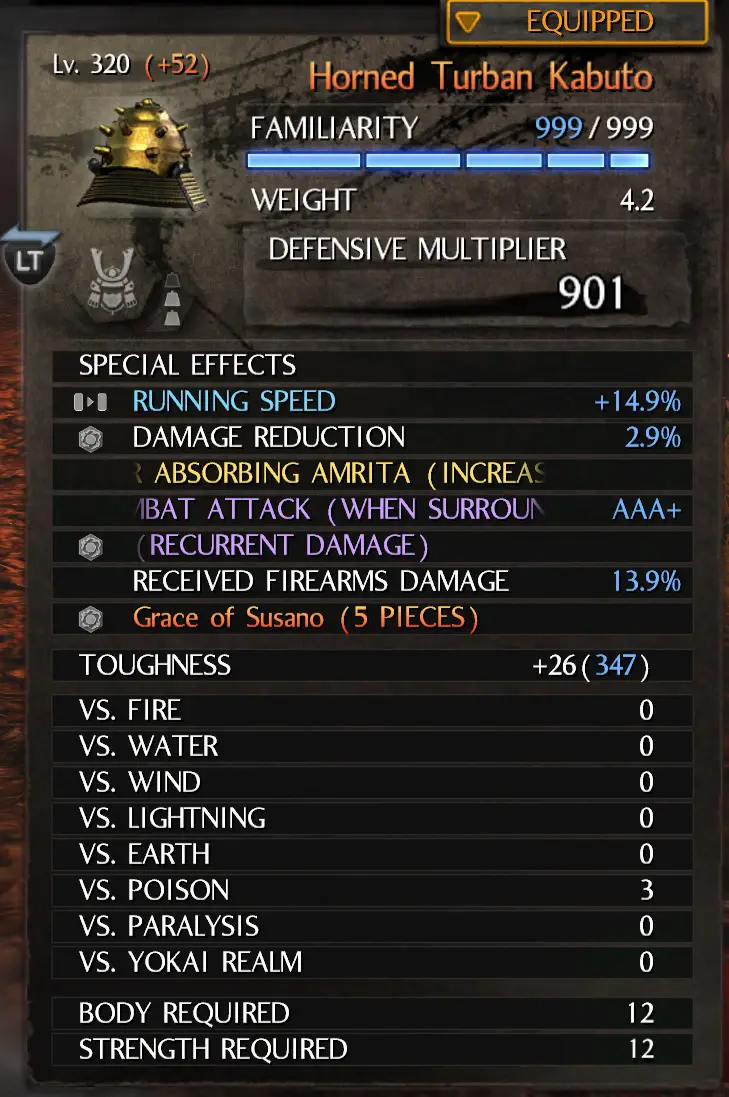
Special Effects:
1. Running Speed 14.9% (Inherit from Leg Guard/Boots)
2. Damage Reduction 2.9% (Locked)
3. Bonus for Absorbing Amrita (Increase Movespeed)/(Increase Attack)
4. CCA (When Surrounded) AAA+
5. Tenacity (Recurrent Damage) (Locked)
6. Received Firearms Damage 13.9%
7. Grace of Susanoo (5 Pieces)
#1 Running Speed is movespeed. Actual running speed (movement with ki consumption) is dash speed.
We have three free inherits. Your options are attack and running speed. Luck is out of the question because this is an end game offensive build. Put that on your farming build instead.
I don’t recommend attack because it only a offers a small flat increase while running speed or movespeed will allow us to move away (without ki consumption) from enemies trying to hurt us, close in on enemies much faster, and get behind them quicker to take advantage of ‘Attack from Behind Damage’ bonuses.
Running speed is especially good on odachi since we don’t get i-frames buffs like the other weapons. There’s no need to rely on dodge i-frames if we can just move out of the way.
Also, if you’re planning to make use of Sanctity Talisman, you’re going to want the running speed since we can’t use our Increase Movespeed buffs while Sanctity Talisman is activated.
WARNING: Do be informed that high movespeed will worsen handling (as in the handling in racing games), so take extra care when moving near water/cliffs.
#6: Reduces damage from all projectiles, not just firearms. Required for complete projectile immunity. We need this along with
#3: Increase Attack only gives 8% damage bonus according to my tests, but we have plenty of movespeed already, so I recommend the attack instead.
#4 The most noteworthy special effect here is the CCA (When Surrounded) AAA+. This is the unique special effect that makes the Horned Turban Kabuto the best helmet in the game. It comes with the helmet, but it’s not locked, so be careful. In my tests, 2 enemies invoked a 14% damage increase and 3 enemies invoked a 30% damage increase. I could not test any further, as the map only had three enemies. It stacks directly with the Increase Attack (When Surrounded) from your chest armor.
Early on, fighting multiple enemies during boss fights might not be so common, but they will be soon, and that’s when the Horned Turban Kabuto will shine.
#5 Prevents death from recurrent damage like from poison or fire. We’ll die without this, so if you decide to get a second helmet for 1v1 purposes (I recommend the Kame-wari Shibata kabuto), make sure to get this.
How to Get the Horned Turban Kabuto
You can’t forge this, you can’t loot it – and if you do, you don’t get the CCA (When Surrounded) AAA+ – the only way to get it is to get it from the poop man himself, who can be found at the Defiled Castle in Tokai Region (Region #4).
He’s behind a locked door right after you climb the first ladder (can’t miss him really), and if you interact with him, he’ll tell you he’ll let you through in exchange for dung balls.
Video below for your reference (Credits to AverageBlackGamer):
Note: This video is just so you know where poop man is. There’s a faster method down below.
Kame-wari Shibata’s Kabuto Smithing Text
Should you decide to make a second helmet for 1v1 purposes, you can find the kame-wari smithing text from Hanzo in te abyss. 4th floor, red flag. There’s a video far up that shows where he is.
How to Get the Required Dung Balls Quickly
In the Omi Region (Region #6), two regions after Tokai Region, there’s a mission called ‘A Defiled Holy Mountain’.
Start the mission, follow the path straight and up a series of ramps, until you find yourself a ladder (this is exactly straight from where you started, just that you had to climb up some ramps), down which you’ll find a raven tengu to your right (don’t fight him) and a house below you under the cliff. Drop down to the house (You shouldn’t have fought the raven tengu. It’s a waste of time.), walk around the house, and into the door, and there you’ll find a corpse you can loot. It gives two dung balls. Use the blue himorogi branch (to keep your amrita and exit the mission) and repeat the process until you have 20 dung balls. This should take you 10 runs all in all.
Note: If you don’t have a blue himorogi branch, you have a purple one in your inventory. It has unlimited uses, but it will take all of your amrita away.
Video below if you prefer that. Credits to ALaa Alharbi:
IMPORTANT/WARNING: Weapons without inherits are good. Armor without inherit are bad (Because some special effects are unique to other armor pieces), so inherit something onto this helmet as soon as you get it. That way you won’t make the mistake of defiling it without an inherit. Otherwise, you will never be able to inherit anything on this helmet, and we want to inherit running speed or attack on it.
Chest Armor: Tatenashi Do
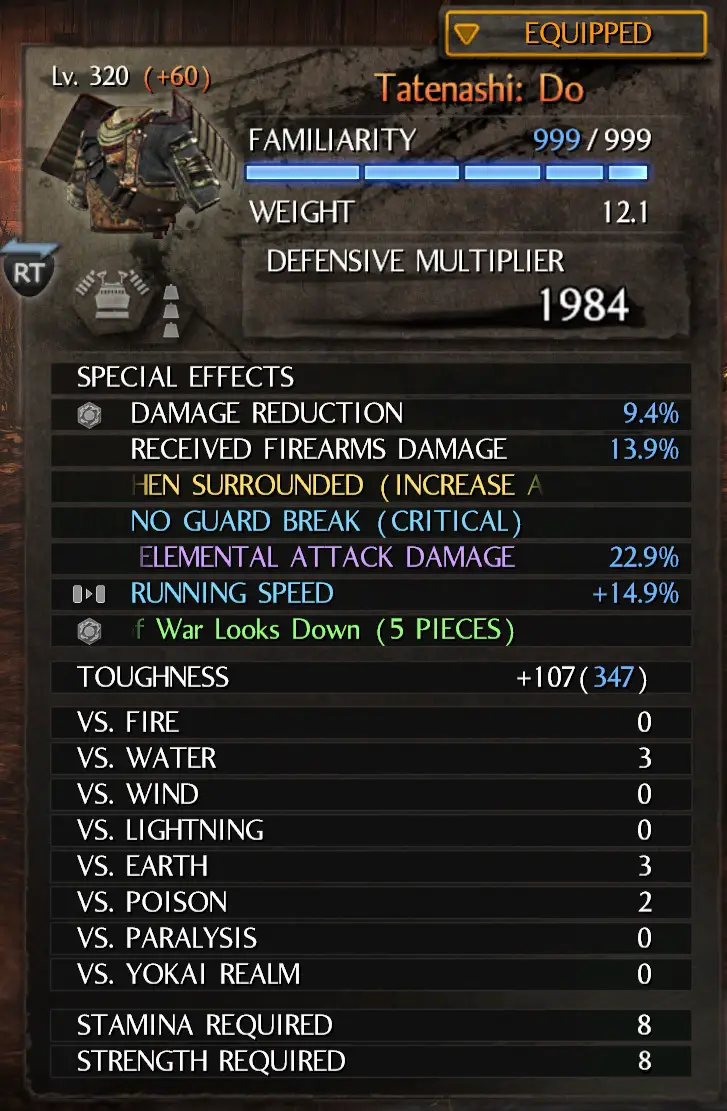
Special Effect:
1. Damage Reduction (Locked)
2. Received Firearms Damage 13.9%
3. Bonus When Surrounded (Increase Attack)
4. No Guard Break (Critical)
5. Received Elemental Damage 22.9%
6. Running Speed (Inherit from Leg/Feet Armor) 9.9% (14.9%)
7. The God of War Looks Down (5 Pieces)
#3 Gave a 30% attack buff last I tested it. It stacks directly with Horned Turban Kabuto CCA, activates only when there are 3 enemies aware of you, and lasts for as long as there are at least three enemies aware of you. A sword icon will indicate it’s working.
#4 ‘No Guard Break’ is actually better termed as no stagger, and when coupled with elemental damage immunity and firearms damage immunity (projectile damage immunity), we gain the power to take advantage of timings that would otherwise be impossible due to stagger and/or damage.
We’re going to be using a hermit talisman, so if you’re not using Sanctity Talisman, you can change this to whatever you want.
Smithing Text Location
Return of the Gourd in Omi Region (Region #6). Drop rate is not affected by difficulty.
I think it’s one of the bosses who drops it, but either way, kill everyone and strip ’em bare… over and over until they finally spit out those bloody sheets of paper.
Gauntlets: Tatenashi Kote
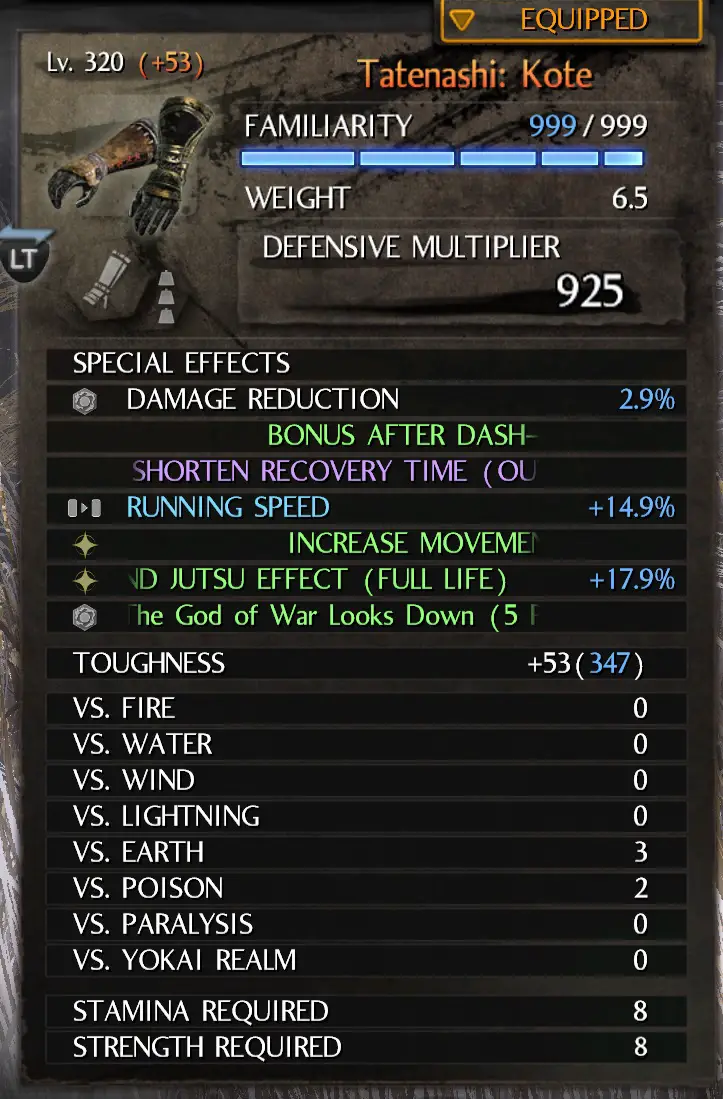
Special Effect:
1. Damage Reduction (Locked)
2. Bonus After Dash Attack Increase Attack
3. Shorten Recovery Out of Ki (Replace this with something else if you’re using Atlas Bear)
4. Received Elemental Attack Damage 22.9% (Inherit)
5. Increase Movement Speed (Ninjutsu Item Hits) (Starred) (Abyss Only Drop)
6. Extend Jutsu Effect (Full-Life) +17.9% (Starred) (Can be forged)(Priority)
7. God of War Looks Down (5 Pieces)
#2 Nullify isn’t recommended because there are bosses that attack twice no matter what, rendering nullify mute.
Damage surge isn’t recommended because the only way to make use of it is either with a low quick or an evasion attack, both of which are weaker than an evasion attack + strong attack. A one-two-three combo (dash attack, evasion attack, strong mid) is possible but not all the time, so I suggest just going for the increase attack, so at least you’re always able to take advantage of the bonus. You can even use it with your skills.
The bonus damage is 13% according to my tests.
Dash attack bonuses conflict with Close Combat Attack Increase, but we don’t want it since it doesn’t last long enough for any strong attack other than low attack to take advantage of.
The damage bonus from CCA Increase isn’t big enough to bridge the gap between low strong and mid strong either.
#3 As mentioned, you can replace this with something else if you’re using Atlas Bear. Attack or duration bonus. Whatever you want.
#5 Can’t be forged. Only drops in the abyss. Nice to have, not a necessity. If you don’t have it. No sweat. Just change it to something else. It’s harder to get a specific starred effect for a set gauntlet than it is for grace, so don’t obsess over this too much. Gauntlets don’t drop frequently either in my experience.
#6 Can only be forged or looted. Doesn’t necessarly have to be from the abyss. If you’re trying to go for #5 and this one on the same pair of gauntlets, then you’re gonna need some really good RNG rolls. It’s actually possible to get three starred stats in one gloves, but I’ve only seen ones where two are green and one is white. I don’t know if three green stars is possible.
Leg Guards: Tatenashi Armor: Hizayoroi
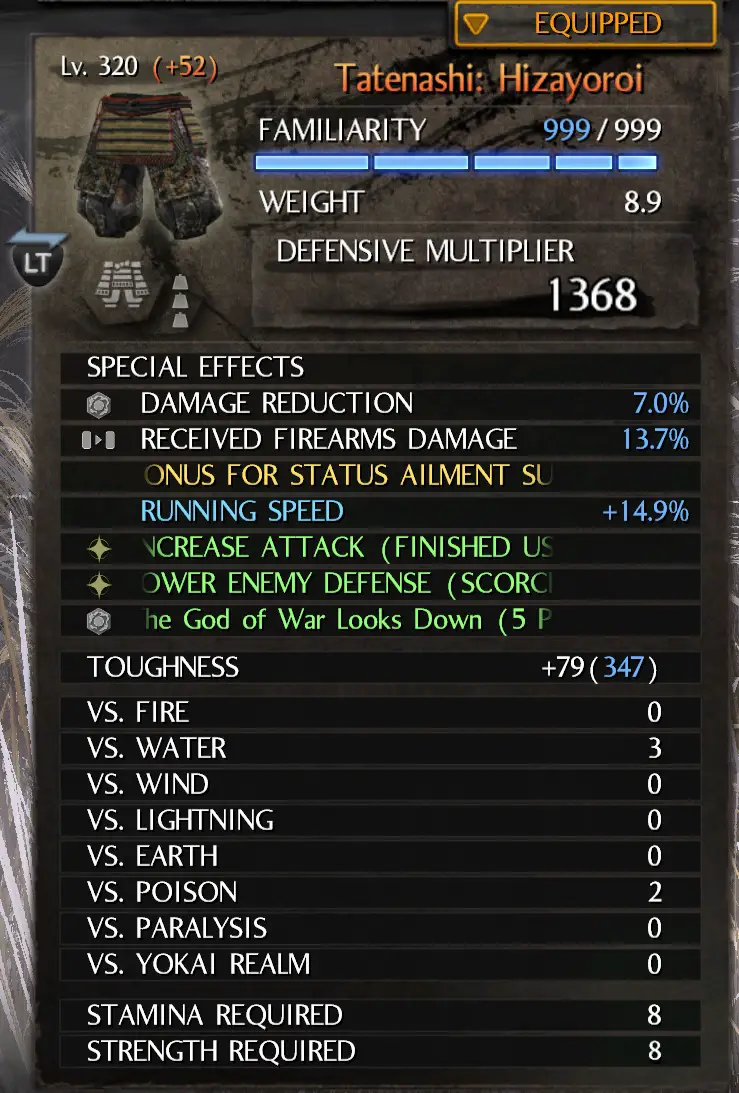
Special Effect:
1. Damage Reduction (Locked)
2. Received Firearms Damage 13.7%
3. Bonus for Status Ailment Suffered (Increase Attack)
4. Running Speed +14.9%
5. Increase Attack (Finished Using Living Weapon) (Starred)
6. Lower Enemy Defense (Scorched) (Starred)
7. God of War Looks Down (5 Pieces)
#3 I can’t tell you how much damage it gives because I don’t know how to test it.
#5 #6 Both can be forged for. Easiest double star in the world too since they don’t have numbers.
Shin guards/Boots: Tatenashi: Suneate
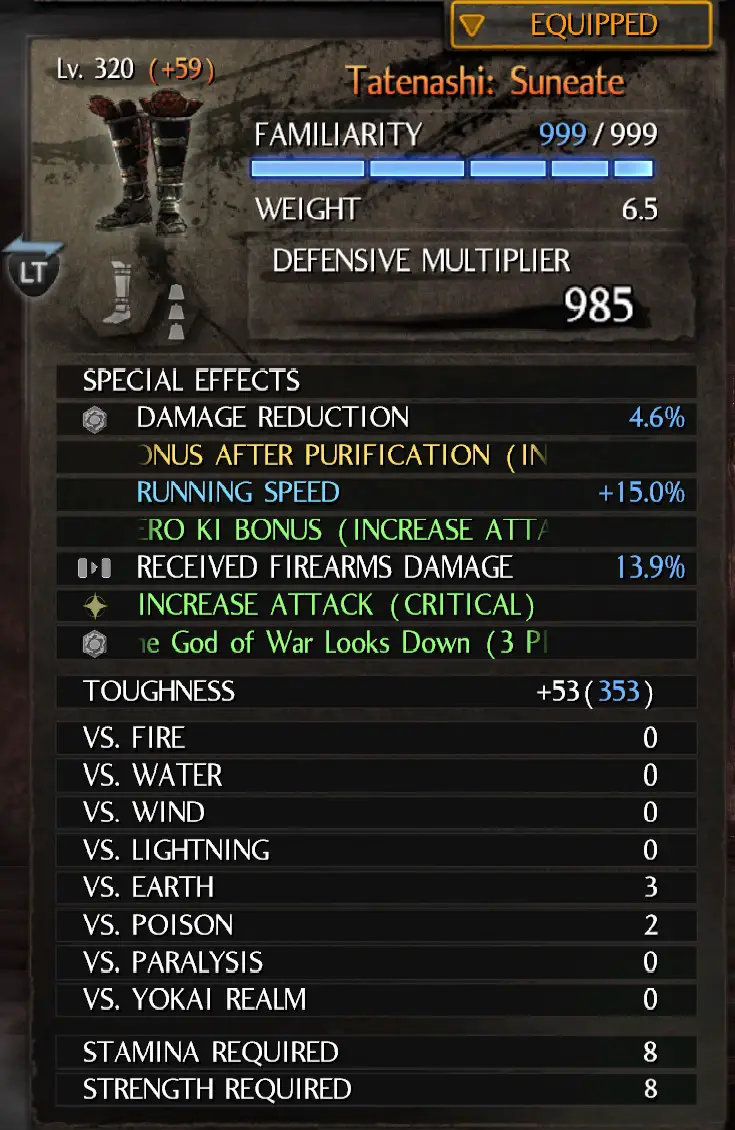
1. Damage Reduction (Locked)
2. Bonus After Purification (Increase Attack)
3. Running Speed +15.0%
4. Zero Ki Bonus (Increase Attack)
5. Received Firearms Damage 13.9%
6. Increase Attack (Critical) (Starred)
7. God of War Looks Down/Tatenashi Set (3 Pieces)
#6 Can be forged for and has no value, so a pretty simple roll. Triggers every time our hp reaches critical state, so you’ll want to get out of critical and then back to refresh it.
Accessories
In order of priority:
1. -1 Set Requirement Bonus
2. Received Firearms Damage 9.x% (x2)
3. Received Elemental Attack Damage 15.x% (x2)
4. Damage (Status Ailments) D-
5. Yokai CCD 14.9% (x2)
6. Special Effects (Critical) 14% (x2)
7. CCA (Scorched) +12.9%
8. Increase Damage (Enemies Defeated When Critical) AA- (Starred)
9. Extend Evasion Invulnerability
10. No Guard Break (Critical)
#1 This is a prerequisite. Make sure to get it.
#2 #3 as long as the percentages all add up to 100% you’re gucci.
#4 I don’t actually have this, but I know it exists because someone showed a picture of it. If you have this, you can get Todo as your clan. Supposedly, gives a 13% damage increase for one ailment.
#5 This one only goes up to 10.9% when locked (yellow prayer beads) but up to 14.9% otherwise.
#6 Nice to have and especially works well if you’re using Kato and a sort of prerequisite to use CCA (Critical).
#7 More damage is always good. There’s a poison that gives up to 23.9% (I think that’s the highest), but poison is hard to inflict for yokai. Stick to scorch.
#8 From my tests, 2% increase for the first kill, then 3% for the next two kills, then 1.7%, and then 1.3%, and then I earthfolded and killed 16 guys in a row, where it finally seemed to cap at around 17.5% damage increase. Even if that’s not the cap, the damage gain is already incredibly tiny, so might as well treat that as the cap.
#9 Increases i-frames, not sure by how much, but with how crippled the odachi is when it comes to i-frames compared to the other weapons, it’s nice to get whatever we can.
#10 I don’t know if this actually exists, but if you find one, you can free up a slot in the chest piece. Please let me know if you find one.
TLDR: Prioritize #1 #2 and #3, the rest are just niceties. Also, Reduced Firearms Damage > Elemental Damage Reduction
Guardian Spirits
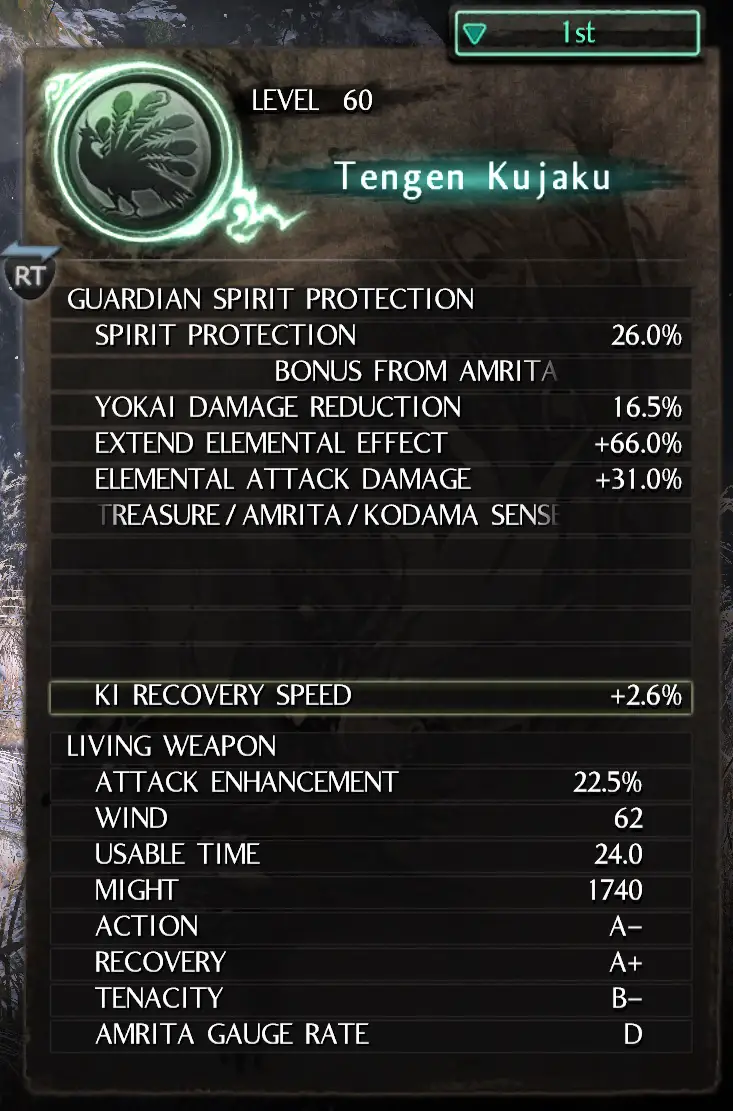
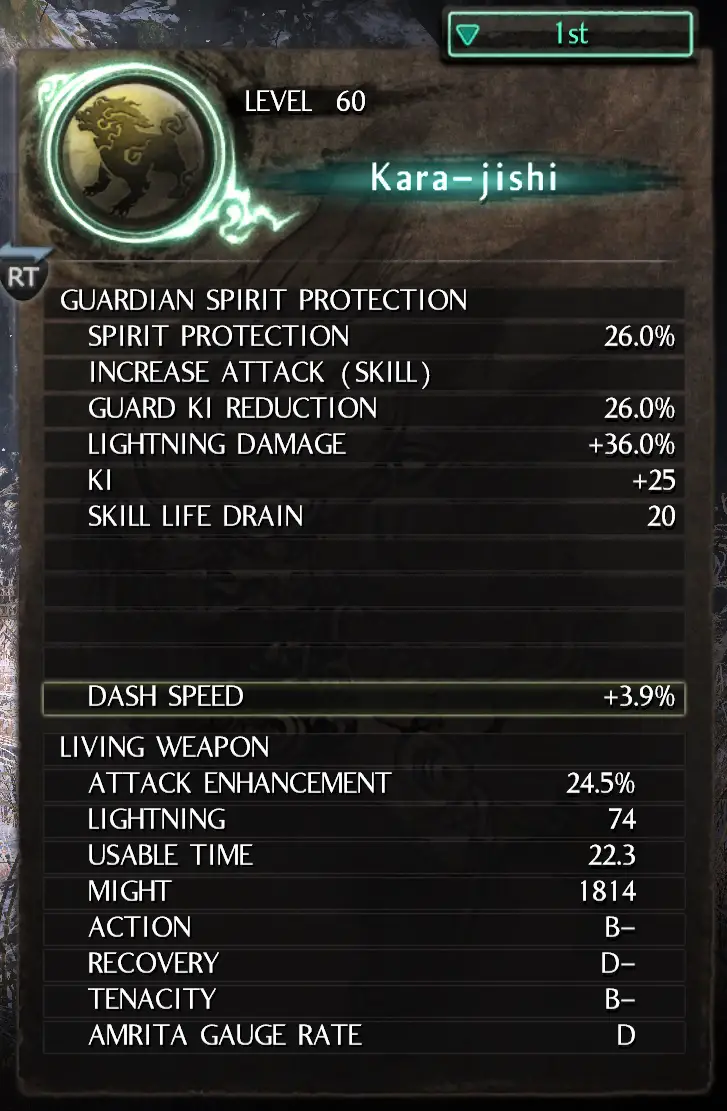
Tengen Kujaku should be your first spirit, as I can’t recommend Karajishi.
Karajishi invokes the same attack buff as tengen’s – yes, the exact same, such that if you trigger karajishi’s buff, and then try to trigger tengen’s or vice versa, you’ll only end up refreshing the timer – without offering tengen’s two other buffs: defense at mid stance and ki recovery at low stance.
On top of that, tengen also offers enemy/treasure/amrita/kodama sense, extend elemental effect (affects scorch and other similer effects), and a living weapon attack that allows you to change its element (yes you can have all elements in one guardian spirit)…
In comparison, Karajishi only really offers lightning damage bonus (but elemental damage sucks in general and tengen offers elemental damage bonus that applies to all elements, at least, I’m pretty sure it applies to all elements. I have not tested it.), skill life drain, and some bonus ki and ki reduction while guarding. I will concede that Karajishi’s guardian talisman isn’t too bad as it allows you to electrify someone, but it’s not really worth it in my opinion.
TLDR for the above wall of text: Don’t get Karajishi. Get Tengen Kujaku instead.
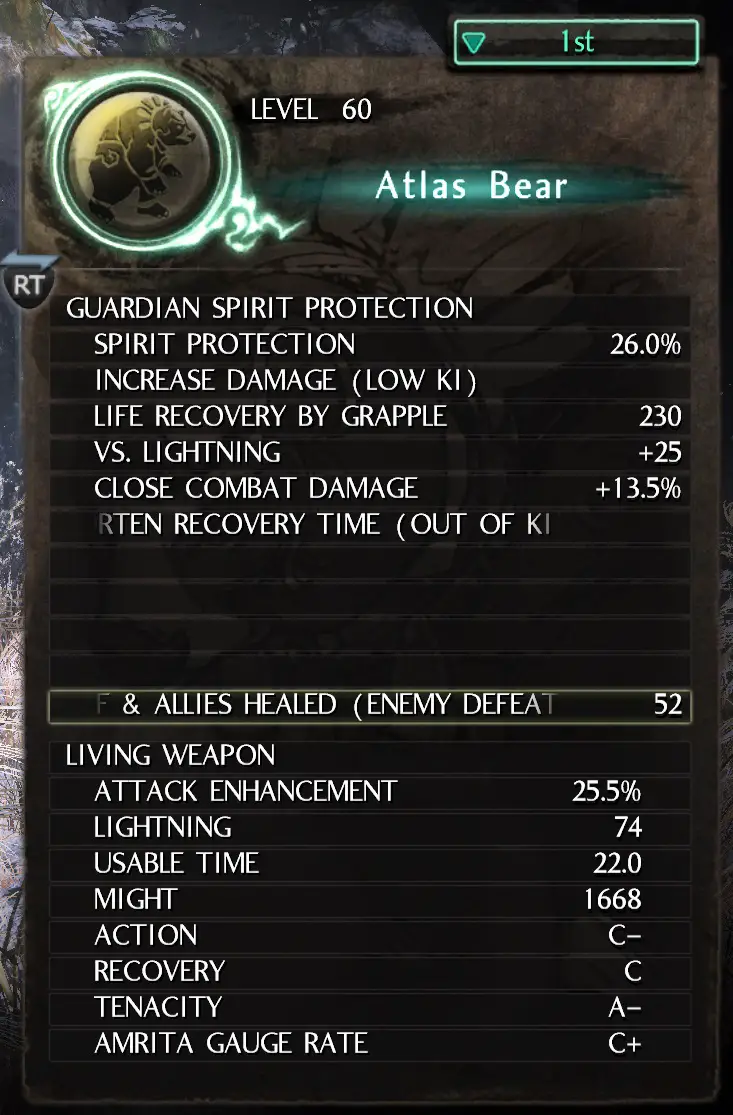
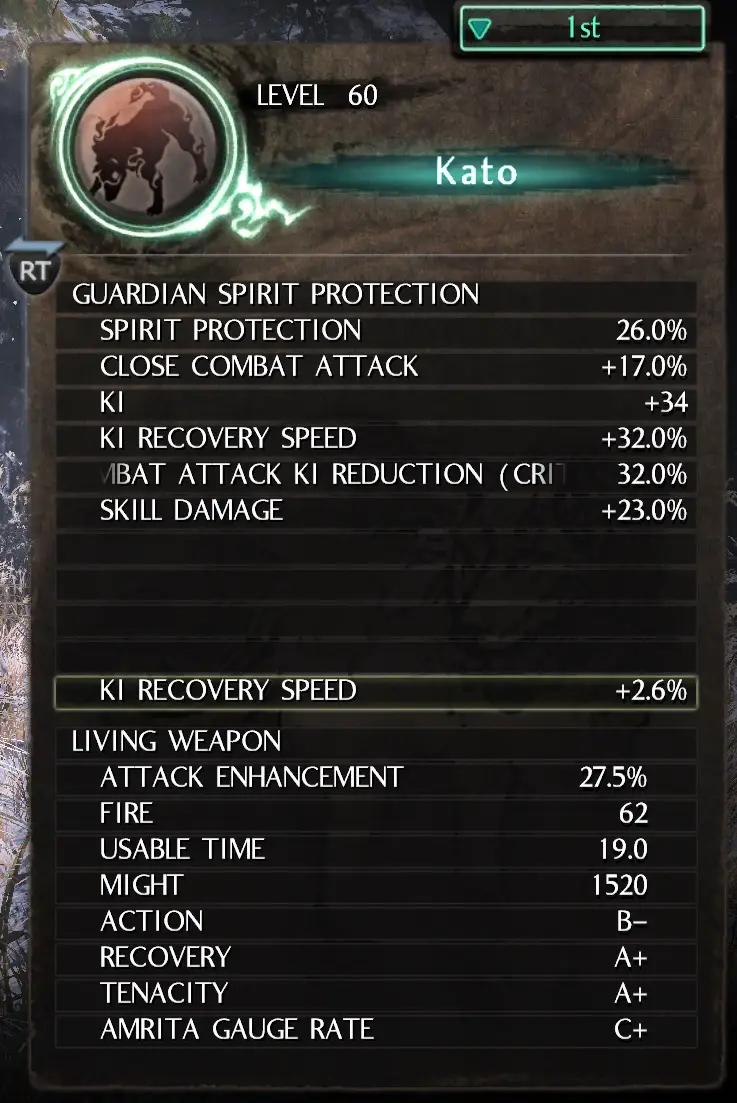
Your next two options then are Kato or Atlas Bear. Which one you pick will be up to you, but I’ll list their pros and cons below:
| Pros | Cons |
|---|---|
| Powerful Guardian Talisman Against Humans | Less Ki |
| Stronger Damage When Ki is Low (e.g. 14% more damage vs Kato at 70/209 ki before attacking. | Slower Ki Recovery |
| Higher Ki Consumption | |
| Weaker Living Weapon | |
| Slightly Weaker Damage at Max Ki | |
| Only 3 evasion attack combos in a row without flux |
| Pros | Cons |
|---|---|
| More Ki | Less Damage at Low Ki |
| Faster Ki Recovery | Weak Guardian Talisman Effect |
| Less Ki Consumption | |
| Higher Damage at Max Ki | |
| Living Weapon Attack that Can Scorch | |
| Stronger Living Weapon | |
| At least 5 evasion attacks in a row before running out of ki |
So, Kato for less downtime and higher damage at high levels of ki or for skill attacks; Atlas Bear for maximum damage when using evasion attack combos at low ki and an anti-human guardian talisman.
Edit: Just got Janomecho and apparently she’s bloody awesome. She gives 22.5% CCA (Critical) (a percentage point higher than hi-nezumi), increase ki recovery (critical), 60% prevent death when not critical, evasion ki usage, auto recovery after using living weapon, a living weapon state that’s not that much weaker to kato, and a living weapon attack that’s the wind element of the burning oil jar, allowing easy discord. I need some more testing, but I think she’s a better pick over kato/atlas bear.
Guardian Spirit Switching
You can use two guardian spirits once you’ve beaten the game once.
To make full use of our guardian spirits, trigger the attack buff while Tengen Kujaku is active by absorbing amrita in high stance.
Yes, you don’t have to attack in high stance, just make sure you’re in high stance before the amrita (that yellow ball thingy) touches your character, and then promptly switch to your other spirit and hack away.
In this way, you will take advantage of Tengen Kujaku’s 68% attack buff (according to the wiki) while also benefitting from the bonuses of your other spirit. You will also still benefit from tengen’s extend elemental effect bonus.
When clearing maps, you might want to stay in Tengen, however, to take advantage of its enemy/treasure/kodama/amrita sense.
Clan
Todo if you have the Damage (Status Ailments) accessory. Otherwise, go with Yamanaka.
Skills
Get the following skills:
Shared: Grapple, Flux, Flux 2, Flash Attack, Melee Attacks 100/100
Sword: Indomitable Spirit 3/3, Relentless 3/3
Dual Sword: Tachi Arts 3/3, Defense Arts 3/3
Spear: Cornered Tiger 3/3, Rule of Thrusting 3/3
Axe: Fortitude 3/3 Cornered Boar 3/3
Kusarigama: Armor Piercer 3/3, Shadow Strike 3/3
Odachi: Everything.
Ninjustu; Sneak attack (Including this here since it’s used in the next section.)
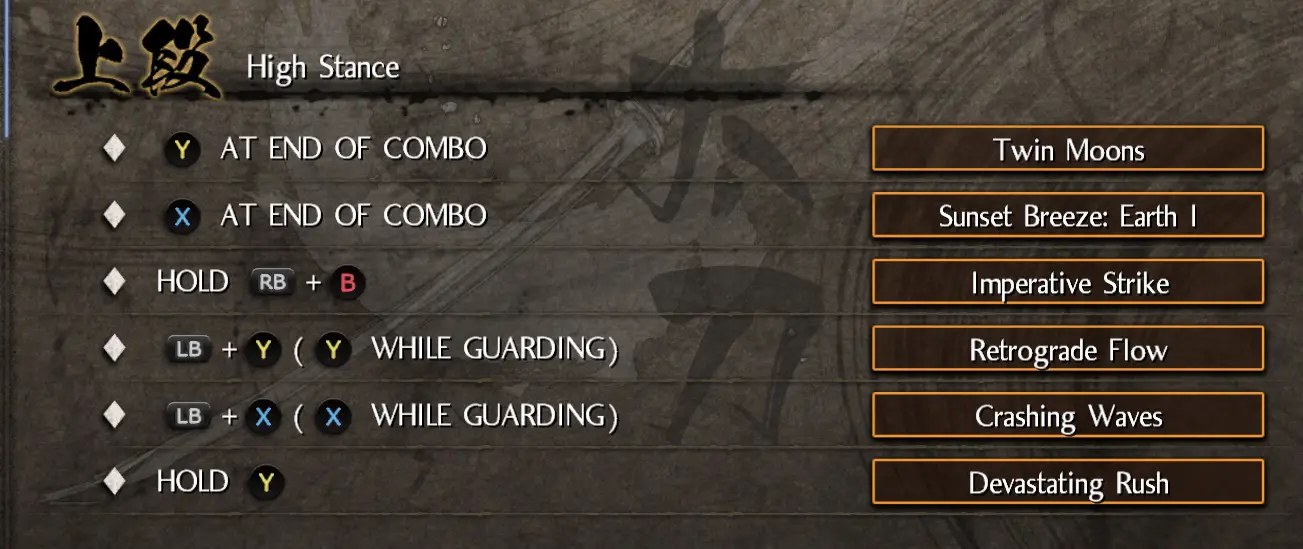
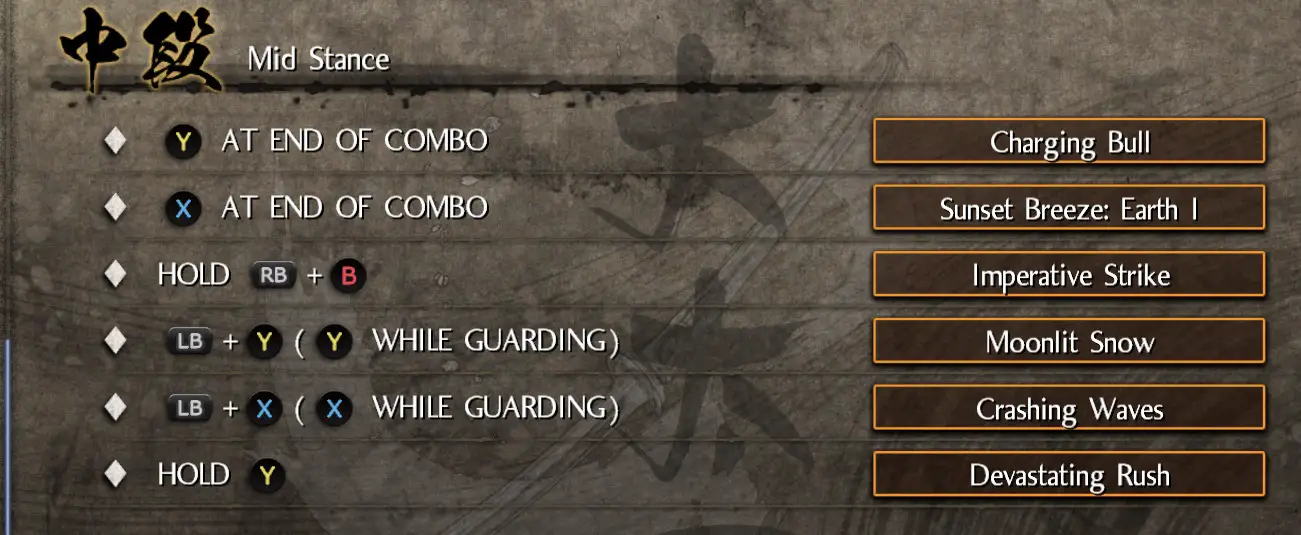
Odachi Setup:
Note: As mentioned, this build doesn’t rely on any combo, so you don’t have to copy this. This is just for your reference.
Ninjutsu
Note: Start from the bottom of the skill tree in your game and read everything on this list first.
In no particular order:
1. Ninja Tool Mastery 3/3 (Note: Get enough to use your ninjutsu.)
2. Endurance 3/3, Snakebite Technique 3/3
3. Medicine Man 3/3
4. Catwalking 3/3
5. Quick Change 3/3 (Note: Prioritize This)
6. Dodging 3/3
7. Tiger Running 3/3
8. Dodging 3/3
9. Cloudrunner 3/3
10. Bowmaster 3/3 (Only if you got the unlimited arrows or use bows.)
11. Flame Dragon 3/3 (This skill drops from Jin Hayabusa in Master Ninja. You can also get it from him if you fight him in the abyss.)
12. Paralytic Control 3/3
13. Shuriken 3/3
14. Thrown Blade Technique 3/3
Mystic Art: Enlightenment (Note: Prioritize this)
Paralytic Control
Paralysis is annoying, so we got this skill. We didn’t get poison, because it can’t kill us (tenacity), only make us stronger due to the Damage (Status Ailment) bonus from eithe accessory or clan.
Medicine Man
Get this once you have Increase Attack (Critical) on your boots. If you run out of elixirs, you can get more by offering your loot at the shrine.
Shuriken
We use this to proc our movement speed buff from Ninjutsu Item Hits (Increase Movement Speed).
Flame Dragon Scroll
We use this for scorch at point blank and to knock out yokais with horns. Recommended to be used for namahage yokais, as it will knock them down 100%, and give you plenty of time to finish them off with a final blow/killing strike. If you use it against the amrita fiends, they’ll be left in zero ki, but won’t be knocked down.
Catwalking
Two effects for one and lasts a long time. Mainly used to avoid aggroing enemies too much. We don’t really want too much attention because of our constantly low HP, and we have more than enough damage when it comes to creeps that we don’t need Horned Turban to activate. The hardest part for this build is actually clearing maps. Bosses are relatively painless.
Onmyo
Note: Start from the bottom of the tree and read everything on this list first.
In no particular order:
1. Incantation Mastery 3/3
2. Earthfolding (Note: You use this to teleport to your last shrine. You can also use it to reset a mission you completed. Sometimes you can’t use it. It depends on the mission.)
3. Guardian Spirit Talisman 3/3
4. Inanimate Enchantment 3/3
5. Hermit Talisman
6. Leeching Talisman 3/3 (Get only if you have tenacity. You will die without it.)
7. Gold Beckoning Rite 3/3
8. Shikisen Luck Rite 3/3
9. Pleiades/Extraction Vital Spirit 3/3 (Prioritize Pleiades/Extraction)
10. Evil Ward 3/3
11. Pure Mind 3/3
12. Pure Heaven 2/2
13. Soul Purge Talisman 3/3
14. Elemental Break (Earthbreak, Water, fire… etc.) 3/3
15. Talisman: Fire 3/3
16. Sanctity Talisman (Note: Go back down the tree. We missed this one.)
17. Kekkai Talisman (Note: Go back down the tree. This is optional.)
Mystic Art: Awakening
Extraction
Extraction gives amrita on hit and is needed to proc our helmet buff and tengen buff. It also works really well with burning oil jar as every tick while the enemy is standing in it will give you amrita.
Pleiades
Increases amrita gauge multiplier so you can use living weapon more often. We want to use living weapon and cancel it to trigger our Finished Using Living Weapon (Increase Attack) bonus. I lost the numbers, but it lasts a long time (20 to 30 seconds IIRC) and gives a pretty strong buff.
Hermit Talisman
Makes us immune to stagger at the cost of receiving more damage. Fortunately, we don’t care about damage since we’re going to die in one hit no matter what.
We use it for both the stagger immunity and to trigger the attack bonus from Damage (Status Ailment).
Lasts for about 2 minutes and 10 seconds with the duration bonus from our gloves.
Leeching
Gives significant amounts of damage at the cost of reducing our life every second. We can’t die it from it as long as we have the Tenacity special effect.
At 100 Magic and 44 Spirit, I observed greater damage bonus from leeching than from Rage (Axe Skill) and Summer Twilight (Kusarigama).
Lasts somewhere around 46 seconds without the duration bonus from our gloves.
Soul Purge
Gives you about 15% more damage at the cost of all of your primary melee weapon’s familiarity.
You lose the familiarity when the duration runs out, when you die, when you switch weapons, and when you negate the effect with sanctity talisman. I assume you lose your familiarity too if the enemy is somehow able to cancel it.
The only way to avoid the familiarity cost is by either using Earthfold or by ending the mission before the spell runs out. Note that you have to actually exit the mission before the spell runs out.
I didn’t time this one, but it lasts significantly longer than leeching.
Sanctity Talisman
From the onmyo tree of big balls like Soul Purge. Use this only when you’ve grasped the enemy’s pattern and make sure to never accidentally cast it.
Negates and prevents all buffs and debuffs for its duration. Lasts for about a minute and five seconds.
If you use this, you can’t even proc quickchange, but it can be useful to finish off an enemy when you’ve been put under elemental effect. E.g. Electrified or Bluster.
Sanctitity will prevent all buffs and debuffs, but anything that doesn’t require an icon should still work, so it works well with this build. Weapon enchantment and spells/ninjutsu that work solely on the enemy will still work too.
Once activated, we only have one life, as quickchange is no longer invokable, and our damage will take a nosedive, but in exchange, we gain complete immunity to elements including their elemental effects.
Best used against bosses with annoying elemental effects like Muneshige.
Kekkai Talisman
We can use this to break yokai realms quickly and trigger our increase attack from boots. You can use this instead of hermit if you want as long as you have No Guard Break (Critical).
If you use this, remove Soul Purge from your shortcuts and replace it with a Yokai Water Pot.
Alternatively, keep hermit and just break the yokai realms manually.
Panacea Curefast
DO NOT GET THIS. Elixir is used in this build for 2 purposes.
1. Bring ourselves out of critical, so we can take it back down to refresh our attack buff from our boots.
2. To reach full life to refresh our buffs and gain the duration bonus.
The first one is relevant in this case. We want to reach critical faster, not slower.
For your reference, without Todo Clan and given the stats and gear in this build, an elixir without boosts brought HP to 2406 from 1, and took 5 ticks of leeching to bring back down to critical.
Flying Sword Talisman
DO NOT USE THIS. It will use up our Attack Damage Surge.
Jutsu Loadout
Note: You can get more shortcuts from Tome. Maximum shortcuts is 16.
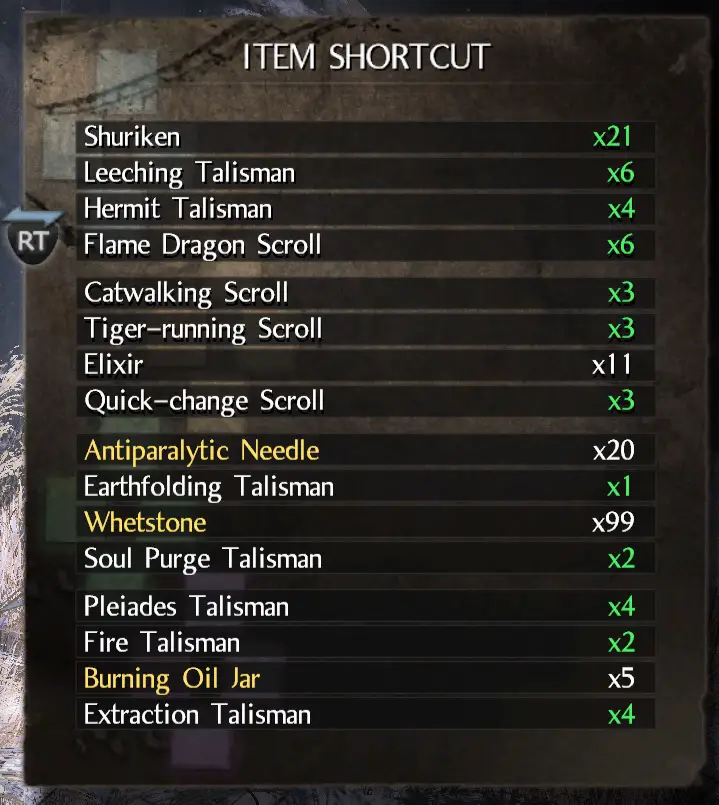
Antiparalytic Needles
Use this to undo paralysis when you’re paralyzed.
Elixir
Use this to bring hp out of critical, so we can bring it back down to refresh our increase attack buff from boots.
Use this also to bring hp to max, so we can refresh the rest of our other buffs with the duration bonus.
You may want to switch hermit talisman with this one in the shortcuts for easier access.
Whetstone
Use this to undo weakening. You’ll need it even if you’re using a taro/jiro odachi unless you have Nullifying Weakening (Weapons) on both accessories.
Burning Oil Jar
Use to set the enemy on fire. Extraction talisman will also proc with each tick, instantly filling your living weapon gauge.
Sanctity Talisman
Don’t put this on a shortcut because if you accidentally invoke it, it’ll leave you unable to use buff/debuff yourself, including quick-change, for an entire minute.
Kekkai Talisman
We can use this to break yokai realms quickly and trigger our increase attack from boots. You can use this instead of hermit if you want as long as you have No Guard Break (Critical).
If you use this, remove Soul Purge from your shortcuts and replace it with a Yokai Water Pot. Alternatively, keep hermit and just break the yokai realms manually.
Note: You probably won’t be using Soul Purge too much. If so, feel free to remove it from the shortcuts and put something else in its place like Sticky Pot or Yokai Water Pot.
Strategy/Tips
Dash Attacks
High Stance Dash Attack: Use when the enemy is sitting or in a low position. Also, good to use to invoke the tengen buff. Deals the most damage, but it’s easy to miss, so make sure the enemy is dead center when you attack them.
Mid Stance Dash Attack: Use only when the enemy is standing. This will miss if they’re in a low position or are sitting.
Low Stance Dash Attack: You can also use this to deal with enemies in a low position, but it does less damage than high stance.
Evasion Combos
Executed with an X (with a forward on the analog stick if needed) plus triangle x2.
High Stance Evasion Combo: Mainly used for counterattacks. Press X before an enemy’s attack hits you, and then triangle x2. Don’t do a forward evasion attack with high stance, as it’s laughably slow.
But if the enemy has a huge gaping opening, then why not? Like for example, there’s a boss that likes to throw swords at you. We’re immune to projectile, so that entire routine becomes one giant opening. Feel free to launch a high-stance evasion combo against him.
Mid Stance Evasion Combo: Can be used with a forward evasion attack (Forward + X + triangle x2). Does significantly more damage than low strong. Just watch the timing since it is slow.
Low Stance Evasion Combo: The fastest but weakest evasion combo. This is also the safest. Unless, you completely misread the enemy, you shouldn’t get hit while using this.
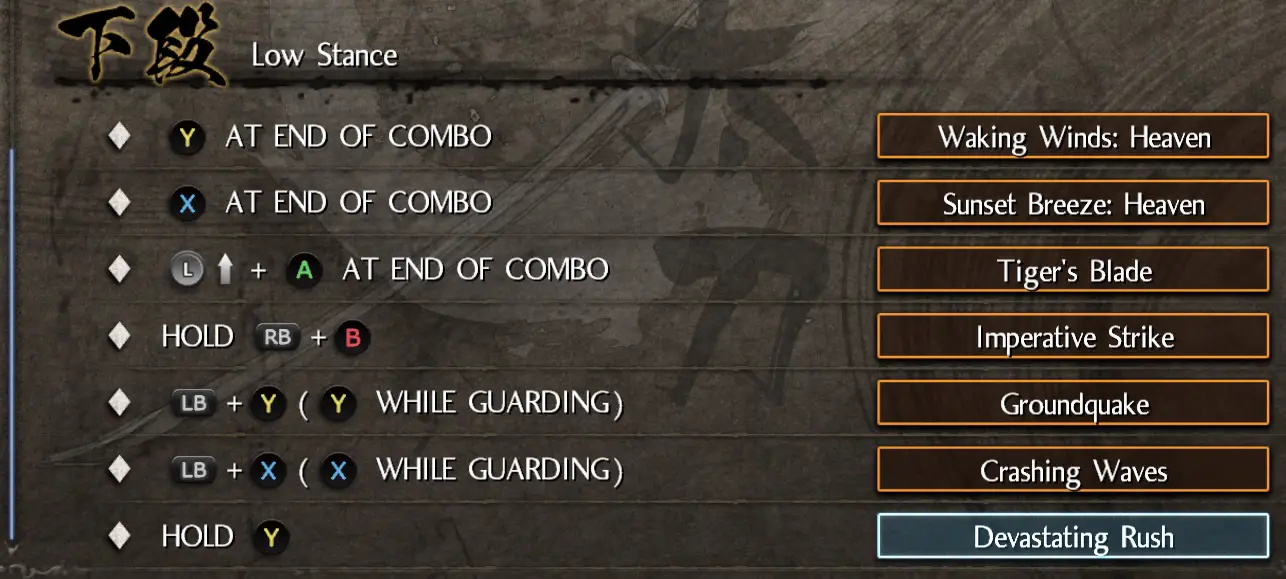
If you use my skill setup, you can follow up X + triangle x2 with square and then triangle (so, X -> Triangle x2 -> Square x1 -> Triangle x1), which will end the combo in twin moons. Not bad if you’re using kato.
Also, be careful because you will use Tiger Blade if you try to dodge/dash forward after the initial evasion combo. Switch to mid stance to avoid this (so, if you want to dash forward after using this, the combo will be forward X + triangle x2 + R1 Square + forward X + R1 X + forward X.)
Alteratively, you could dodge sideways instead, or just remove tiger blade from your skill customization.
Sanctity Talisman
This talisman puts the fun back when anti-fun bosses slow the living hell out of you, as it leave you completely immune to elmental effects and all buff/debuffs, including the ones from ninjutsu traps.
Possible use cases:
1. You’ve been aflicted with sloth/electrify. Use sanctity to bring fun back to the game.
2. You want to electrify the enemy, but every time you do, you get electrified too (replicate status ailment), use sanctify to leave the enemy electrified, while keeping yourself free from its effects.
By the way, if you want to do this, get lightning shot + lightning talisman. Lightning shot to proc the electrify, and lightning talisman to keep it proc’d.
Rules before using:
1. Try to set the enemy on fire first if possible. We want to do this before activating sanctity, so that if we mess up using burning oil jars (throwing is slow), we have quickchange to fall back on.
When the enemy is on fire, CCA (Scorched) and Enemy (Scorched) will trigger, greatly bringing up our attack power. We need as much attack as we can once we activate Sanctity because we can’t use any of our buffs.
2. Exhaust all quickchanges first, so that the enemy hp is as low as possible.
3. Make sure you’re critical.
4. Make sure Kato/Atlas Bear is active, as Tengen won’t work.
Things to keep in mind with sanctity:
1. It lasts for around 1:05, give or take a couple.
2. You can’t buff/debuff yourself at all, but you can still cast ninjutsu/onmyo against the enemy.
3. You can still enchant your weapons too, so make sure to use it to get extra damage and keep the enemy on fire.
4. Tengen doesn’t work during Sanctity. Don’t guardian switch.
5. You have only one life. Tread lightly.
Tengen Tips
Lasts about 20 seconds.
If you have extraction and pleiades activated, killing an enemy will give you two amrita orbs. This will instantly trigger your high attack buff even if tengen is still in cooldown, so feel free to switch to kato/atlas bear immediately after killing someone and absorbing amrita in high stance.
Use it to clear maps. Its enemy sense will prevent you from getting ambushed.
You can also use the ki recovery bonus from it by switching to low stance before absorbing amrita. If you’re using Atlas Bear, you’ll probably want to do this.
Buff Order
1. Quick-Change Scroll/Catwalking/Tiger Scroll/Extraction/Pleiades/Fire Talisman/Hermit –> Leeching. (It’s imperative you cast those other spells first to make use of Extend Jutsu Effect (Full-life)
3. After leeching ends, pop an elixir to take HP outside of critical state, then use Leeching again to refresh your Increase Attack (Critical) buff from your boots.
For your reference: without elixir boosts and todo clan bonus, an elixir will bring your HP to 2406 from 1HP, and leeching will require 5 ticks to bring you back down to critical.
4. Use living weapon when available, then cancel it. You may scorch an enemy with it or fight with it if you want. Just be careful that the enemy doesn’t cancel it for you or you’ll be left vulnerable.
Upon cancelling, you will trigger Finished Using Living Weapon (Increase Attack)
5. When the quickchange/catwalking.. etc. run out, use elixir to refresh life to full after leeching ends, then repeat step 1.
If you’re out of elixirs/whetstone, offering items on the shrine will give you elixirs, whetstones, and spirit stones.
General Gameplay Tips
1. Patience is key in Nioh. If you’re falling to death a lot and getting hit by the enemy at the moment you decide to attack, you’re not patient enough. When in doubt, wait for the enemy to make a move first.
Also, take double care with this build around cliffs/waters because it’s handling is worse at higher speeds.
2. Don’t spam. Count your button presses. I don’t know about the other weapons, but the odachi has some delayed input for some attacks/combos. You will get yourself killed if you spam buttons.
3. Try dodging toward your enemy. It usually works wonders, especially against humans.
4. Spend some time just running around and dodging to learn enemy patterns.
5. You can block. Faster enemies usually have more attacks that can be blocked.
6. Stay in low stance and switch only to mid/high when needed. (E.g. For tengen buff or to attack.)
7. You can cast quickchange in midair if you attack while falling.
FAQ
I will be adding questions here as they are asked. Don’t worry, I’ll answer even if the question’s been answered somewhere in the guide already. It’s a long guide, so I’m sure people are bound to skim and miss something.
Why Bother About Projectile/Elemental Damage When We’re Going Critical?
We need at least 3 people on the field to take advantage of an at least 60% buff from Horned Turban Kabuto and from our chestpiece. I doubt most players are able to dodge bullets while taking a boss on, so getting the projectile damage immunity is the same as getting a 60% attack buff.
The combination of projectile/elemental immunity with no stagger will also allow us the ability to maximize openings.
For example, there is a boss who likes to throw swords at you when you’re far from him. Normally, we’d be dodging his flying swords, but with projectile immunity + no stagger, we can rush to him and do at least two low-evasion combos or even a slow high-evasion combo.
Another example, there’s a boss who likes to shoot water guns or do a whirlwind smash attack. With our setup, we can ignore his elements and attack him while he inflicts 0 damage on us and fail to even stagger us.
Just know that we’re not actually immune to elemental build up, but even then, only Lightning is really a threat. We still do a lot of damage even when blustered (wind element that reduces damage severely), and I personally didn’t get blustered when fighting the wind boss mentioned above despite me dashing into his whirlwind smash attacks every opportunity I could get.
The price for firearms immunity is a cheap one tatenashi piece. In exchange, we get a 60% buff to our attacks when there are at least 3 enemies on the field. That’s an easy condition to meet in the later stages of the abyss.
The second piece of tatenashi gives us Equipment Weight Damage Bonus, and as mentioned before, we want as many unique damage modifiers as they’re multiplicative. Getting EWDB will allow us to get agility damage bonus on our ranged weapons. Another unique multiplier. (Note: To clarify, no, you can’t get both EWDB and Agility Damage Bonus on a ranged weapon.)
So, that means we only have to pay an extra two pieces of tatenashi to gain elemental damage immunity. I think that’s a cheap price to pay considering how much more it allows us to whack the enemy.
In conclusion, projectile/elemental immunity + no stagger may not increase damage numbers, but they allow us more opportunities to attack, which in turn allows us to do more damage. As a bonus, our survivability is increased too.
I hope this answers the question.
What Is Scum Saving and Why Do We Do It?
Backing up and restoring save data so you can circumvent the auto save the game does whenever you manufacture or modify weapon (main reason for save scumming in this game). –Nugro from Gamefaqs.
Defile is RNG. We can’t pick what the grace will be, so we do this to save time. We also lose all defiled items whenever we die without our spirit in the abyss.
This is especially important for Horned Turban Kabuto’s case, as it is a unique helmet. There’s only one of it in the game. If we lose it, it’s gone forever. If we mess up the grace, we have to farm for grace inheritance, and that will take a while.
If you haven’t reached the abyss yet, we can defile non-set weapons and armor to give them a set bonus and upgrade their rarity level.
WARNING: Please remember that if you defile a 6-slot item without inheritance, it will no longer be possible to inherit something on it.
Weapons without inheritance are good, but armor without are bad, so consider inheriting something on the Horned Turban Kabuto as soon as you get it.
I had to repeat a portion of the game because I messed up on this.
Afterwords:
I’m finally done! This took waaaaaay longer than I was expecting! And the build changed several times while I was making the guide because I kept discovering new stuff.
Whew. Anyway, please let me know what you think of the build and the guide itself in the comments below.
Feel free to correct me if you see anything wrong with my numbers or info. Jiggly is willing to learn.
Cheers!
Thanks for the guide I was looking for a way to do this build.
I can see you put so much effort into making this. Sadly, I don’t play console game. I can only afford mobile game for now T^T
Thanks for the guide. Been a while since I’ve played NiOh. Will experiment with this build.
Hi. I dont have on my turban a stat that i can change with running speed. (No play sign near any stat to exchange with a stat from pants or shoes). Is it possible to roll it?
Hi, Metaxa.
You can inherit the inheritable effect on your turban as long as your turban has an empty slot left on its special effect. In fact, make sure to inherit an inheritable on it ASAP, so you don’t make the unfortunate mistake of maxing out all of its slots via the abyss, which would then make it impossible to inherit any effect on it.
Also, I haven’t updated this guide since V2, but there’s actually a better loadout for it now.
Here it is:
Shuriken
Leeching
Elixir
Tiger-Running Scroll
Pleiades
Quick Change
Hermit Talisman
Extraction Talisman
Flame Dragon Scroll
Water Shot
Lightning Shot
Earth Shot or Weakening
Burning Oil Jar (Note: Each tick triggers amrita gain.)
Water Talisman
Lightning Talisman
Shadowround Talisman (Note: use this with burning oil jar to give you more.)
With the above loadout, the idea is to afflict your enemies with discord (automatically afflicted when two elemental afflictions are afflicted on a single enemy at the same time) to further increase damage. Ideally, you’ll want to afflict the water status (bonus damage) and the fire status (bonus damage from our special effects + burn damage) to inflict discord, as you’ll get three sources of bonus damage all in all. The bonus damage you’ll get is INSANE. Seriously.
For the guardians, I found that the strongest combination with this build is Tengen + Janomecho. You have to switch to tengen when absorbing amrita, then go back to Janomecho. Janomecho’s ult is also OP, but it takes a bit of practice to use. Ideally, against enemies that get staggered, you’ll want to use it when they have nowhere left to move to, as the ult will leave them in a stunlock. Throw in a burning oil jar, and boom, you have discord, albeit without the bonus damage from the water status effect, but they’re still as good as dead since you’re free to whack away at them while they can’t move and are also being torn apart by a storm of fire and wind.
If they don’t get staggered, the ult is basically a wind version of the burning oil jar, which is still strong. Makes for easy discord.
Feel free to ask if you have any more questions.
Hi! Did you start playing Nioh2? If so, what odachi do you think is best for current endgame?
Hi Metaxa. Unfortunately, I don’t have a PS4, so no nioh 2 for me until the PC version comes out.